
Wednesday, April 27, 2011
Craftycorner's: 3-D Blooming Wreath
Craftycorner's: 3-D Blooming Wreath: "What a lovely way to decorate your walls for spring. It is colorful and at night it casts a shadow on the wall when it's over a lamp. It w..."


3-D Blooming Wreath
What a lovely way to decorate your walls for spring. It is colorful and at night it casts a shadow on the wall when it's over a lamp. It was quite easy to do.The wreath consists of wire that was bend to a 12" round circle. Then several colors of pipe cleaners were wrapped around the wire until no wire was shown.


The paper flowers were made from a template of a cardboard flower that I had. I used a daisy template and cut several different colors of paper. I layered 3 petals for each flower, different colors for each. I hole punched in the middle of each petal. Bent a pipe cleaner and thread a pony bead to the halfway. I pushed both ends of the pipe cleaner through all of the 3 petals, make loops for the leaves and the stems. I made about 20 flowers. I didn't have to bunch them, I scattered them. With the end of each flower I twisted them around the wire. No glue was used for this wreath.
Paper Flower Decanter
Use any glass decanter that you have or empty used any bubble bath or dish soap that have pretty shapes. Soak the label. You can paint a pretty scene right on it. I used Tulip paints and painted a butterfly on the glass decanter. I added my paper flowers that I had extra from the wreath and put them on my window sill.


The paper flowers were made from a template of a cardboard flower that I had. I used a daisy template and cut several different colors of paper. I layered 3 petals for each flower, different colors for each. I hole punched in the middle of each petal. Bent a pipe cleaner and thread a pony bead to the halfway. I pushed both ends of the pipe cleaner through all of the 3 petals, make loops for the leaves and the stems. I made about 20 flowers. I didn't have to bunch them, I scattered them. With the end of each flower I twisted them around the wire. No glue was used for this wreath.
Paper Flower Decanter
Use any glass decanter that you have or empty used any bubble bath or dish soap that have pretty shapes. Soak the label. You can paint a pretty scene right on it. I used Tulip paints and painted a butterfly on the glass decanter. I added my paper flowers that I had extra from the wreath and put them on my window sill.
Tuesday, April 19, 2011
Butterfly Mobile
This colorful butterfly mobile was so easy to do and fun. It only took pastel tissue paper, pipe cleaners, either elastic cord or any string you may have and a place to hang on
I layered 2 layers of tissue, measured a 4 inch square and made a butterfly shaped by rounding the corners and make a indent the middle. Then I bent a pipe cleaner in half and slip the 2 pieces of tissue. Twist the pipe cleaner at the top, scrunched the tissue in the middle. Put the elastic cord where you twist the pipe cleaner and loop it once just to give it enough cord so that the next butterfly will go on the same fashion, etc.


 I made contrary colors with the pipe cleaners. I think this was the cutest craft I ever did and I saw it last night while I was browsing the net for something else. I made loops at both ends, so that I could hang it.
I layered 2 layers of tissue, measured a 4 inch square and made a butterfly shaped by rounding the corners and make a indent the middle. Then I bent a pipe cleaner in half and slip the 2 pieces of tissue. Twist the pipe cleaner at the top, scrunched the tissue in the middle. Put the elastic cord where you twist the pipe cleaner and loop it once just to give it enough cord so that the next butterfly will go on the same fashion, etc.


Sunday, April 10, 2011
Craftycorner's: My Easter Decorations....These are tooo cute....
Craftycorner's: My Easter Decorations....These are tooo cute....: "EASTER CENTERPIECE I have been soo busy doing some decorations for Easter. I wanted to do a different centerpiece than last year. You saw ..."
My Easter Decorations....These are tooo cute....
EASTER CENTERPIECE
I have been soo busy doing some decorations for Easter. I wanted to do a different centerpiece than last year. You saw my woven Easter baskets. I had the cutest bunny template that I was going to put another basket but I decided to use it for my counter centerpiece. I made the cardboard template and drew the features freehand (yes...that is true). I am not an artist but at a lark, I can do some dandy things. I did that on both sides and painted the bunny with Tulip paints. I had a square piece of styrofoam and a straw that I cut halfway. I inserted the straw into the two pieces of the cardboard bunny and the styrofoam where I punch holed. I hot glued the straw into the hole into the styrofoam.
I took Easter grass and hot glue all around the styrofoam to look like grass. You notice it looks like the bunny is on a hill. My platter last year was too little....sooo, I improvised. What better than a big pizza pan. I had a big one 16". I alternated pink and green Easter grass around the pan. The napkin holder is from lipton tea carton that I put my woven paper onto and hot glued around it. Same as the salt and pepper shaker.
EASTER BOW WREATH
I have that pastel paper that I wanted to do a Easter wreath. I had the wire already and the pink ribbon. It took many strips of paper, I took a ruler and each piece of paper, marked 1.5" wide and 8" long strips folded in half...so I had 4 inch loops. Then I had to hot glue each strip to a make 8 strips to make a bow. That wreath took me a long time. After I attached all the bows I took my shiny pink ribbon and wrapped all around the wreath and made a bow on top of the wreath. I have it on my wall in my front room.


I have been soo busy doing some decorations for Easter. I wanted to do a different centerpiece than last year. You saw my woven Easter baskets. I had the cutest bunny template that I was going to put another basket but I decided to use it for my counter centerpiece. I made the cardboard template and drew the features freehand (yes...that is true). I am not an artist but at a lark, I can do some dandy things. I did that on both sides and painted the bunny with Tulip paints. I had a square piece of styrofoam and a straw that I cut halfway. I inserted the straw into the two pieces of the cardboard bunny and the styrofoam where I punch holed. I hot glued the straw into the hole into the styrofoam.
I took Easter grass and hot glue all around the styrofoam to look like grass. You notice it looks like the bunny is on a hill. My platter last year was too little....sooo, I improvised. What better than a big pizza pan. I had a big one 16". I alternated pink and green Easter grass around the pan. The napkin holder is from lipton tea carton that I put my woven paper onto and hot glued around it. Same as the salt and pepper shaker.
EASTER BOW WREATH
I have that pastel paper that I wanted to do a Easter wreath. I had the wire already and the pink ribbon. It took many strips of paper, I took a ruler and each piece of paper, marked 1.5" wide and 8" long strips folded in half...so I had 4 inch loops. Then I had to hot glue each strip to a make 8 strips to make a bow. That wreath took me a long time. After I attached all the bows I took my shiny pink ribbon and wrapped all around the wreath and made a bow on top of the wreath. I have it on my wall in my front room.


Thursday, March 31, 2011
Call me Dream Weaver....seriously...! !
I had the weaving bug and I cant stop...lol. I was browsing on the net one night and something caught my eye and I was in the mode ever since. Since Easter is coming and we need baskets.....for the kiddies. Adorable ones that you do yourself and dont have to spend alot of money to make one. I have a grand-daughter who's just turned 3 years old. She is precious and I have a pre-made basket for her already. All I need is the goodies to put inside of it.
This particular basket was weaved from different colored pastel printer paper. I had pink, yellow, blue and green. Made a grid with the main color and I interweaved with the other colors. You can see the pink mat in one of the pictures. One of the sides of the basket the main color is yellow. I joined the sides with hot glue. The bottom has another color.
Ok....for the inside....just take a empty plastic gallon of milk and cut all the way to halfway or you get 6" inches of plastic jug. Cut out the spout and handle and make sure it's even all around. Dont worry about the circular indentation that they have on the sides. When you hot glue the weaved paper grid press it really good onto the milk jug and it will adhere. For the handle I simply hole punched into the milk jug......NOT into paper.. for security reasons. I twisted 3 pipe cleaners of different colors and when I threaded them through the holes of the milk jug I twisted the ends of the pipe cleaners.
Weaving with toilet paper rolls....
For the other weaved projects.....believe it or not I used toilet paper rolls. (there's that word again...lol). I flattened out the rolls and made a grid making 1 cm lines across the roll. Then cut each line. I have a great tip to weave: Secure the vertical strips with scotch tape on a surface that will it....that will be easier to weave. Take the horizontal strips and weave until you have a whole grid.
Take off the tape, get your hot glue gun ready and fold over all the strips over. You will have many strips to bend over to the other side. *
* Since the toilet paper roll measures 4 x 5....you want the vertical strips to be 4".
Make the grid so that horizontal lines will be 5" ... so that it's easier to weave. Then I painted the weaves with tulip paints. I like the 3D paints because I like to mix them and make different colors and when dry they are shiny.
You will have to make 3 of these grids to make that cute cylindrical shape that I made. I put my sweetener packets into it.To make that I just got empty powder drink container and took off the label, measured down about 2 inches down. Cut off the the excess and glued the weave around the container.


This particular basket was weaved from different colored pastel printer paper. I had pink, yellow, blue and green. Made a grid with the main color and I interweaved with the other colors. You can see the pink mat in one of the pictures. One of the sides of the basket the main color is yellow. I joined the sides with hot glue. The bottom has another color.
Ok....for the inside....just take a empty plastic gallon of milk and cut all the way to halfway or you get 6" inches of plastic jug. Cut out the spout and handle and make sure it's even all around. Dont worry about the circular indentation that they have on the sides. When you hot glue the weaved paper grid press it really good onto the milk jug and it will adhere. For the handle I simply hole punched into the milk jug......NOT into paper.. for security reasons. I twisted 3 pipe cleaners of different colors and when I threaded them through the holes of the milk jug I twisted the ends of the pipe cleaners.
Weaving with toilet paper rolls....
For the other weaved projects.....believe it or not I used toilet paper rolls. (there's that word again...lol). I flattened out the rolls and made a grid making 1 cm lines across the roll. Then cut each line. I have a great tip to weave: Secure the vertical strips with scotch tape on a surface that will it....that will be easier to weave. Take the horizontal strips and weave until you have a whole grid.
Take off the tape, get your hot glue gun ready and fold over all the strips over. You will have many strips to bend over to the other side. *
* Since the toilet paper roll measures 4 x 5....you want the vertical strips to be 4".
Make the grid so that horizontal lines will be 5" ... so that it's easier to weave. Then I painted the weaves with tulip paints. I like the 3D paints because I like to mix them and make different colors and when dry they are shiny.
You will have to make 3 of these grids to make that cute cylindrical shape that I made. I put my sweetener packets into it.To make that I just got empty powder drink container and took off the label, measured down about 2 inches down. Cut off the the excess and glued the weave around the container.


Wednesday, March 16, 2011
3-D Spring Scene
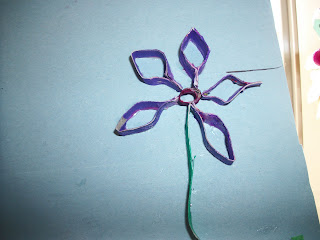
Wow.... it's been awhile since I blogged here. I did some crafts since then and I did a recycle project which it was really cute. I had myriad of toilet paper rolls (I loathe that term) laying around the house because I was going to do some crafts......one day or another. I did a cute Spring scene with flattened tp rolls. I posted the directions in case anyone wanted to know. I hope you like it.
1. Glue any colored construction paper onto cardboard. The standard size is 8.5 x 11 but I used a piece of cardboard larger so I had to cut another piece of paper.
2. Make grass with green construction paper all across the bottom and used the scissors to cut fringe about 1 cm intervals but dont cut all the way, leave a little to make the fringe.
3. I used a greeting card for my template and you can use any picture for your guide. I flattened toilet paper rolls and measured 1 cm intervals and with a pencil and ruler made lines till I came to the end of the rolls.
4. With your scissors, cut the lines you drew and you will end up about 10 or more strips.
5. You will have to cut strips in half for some of the pieces of the scene. Some you will have to curl, bend, coil, depends on the scene you are working with. If you look at the bird I made, that was very intricate, I made little oval for body and shaped it somewhat. I shaped a piece to make the beak, a circle for the head, I feathered the tail. I colored the belly to make it look like a robin.


1. Glue any colored construction paper onto cardboard. The standard size is 8.5 x 11 but I used a piece of cardboard larger so I had to cut another piece of paper.
2. Make grass with green construction paper all across the bottom and used the scissors to cut fringe about 1 cm intervals but dont cut all the way, leave a little to make the fringe.
3. I used a greeting card for my template and you can use any picture for your guide. I flattened toilet paper rolls and measured 1 cm intervals and with a pencil and ruler made lines till I came to the end of the rolls.
4. With your scissors, cut the lines you drew and you will end up about 10 or more strips.
5. You will have to cut strips in half for some of the pieces of the scene. Some you will have to curl, bend, coil, depends on the scene you are working with. If you look at the bird I made, that was very intricate, I made little oval for body and shaped it somewhat. I shaped a piece to make the beak, a circle for the head, I feathered the tail. I colored the belly to make it look like a robin.


Subscribe to:
Posts (Atom)